To create a new review, click the "New Review" toolbar button:
![]()
You can also click on the "New Review" button on the main menu on the "Home" page.
You will see a form in the Review Creation Wizard:
If the Groups feature is enabled and you belong to a group, the first box you will see is the Group box in the Review Creation Wizard:
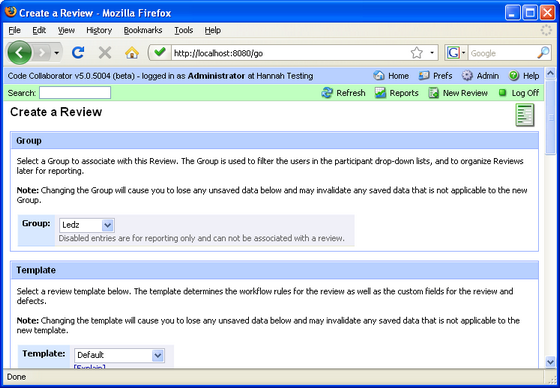
A group must be selected to create the review. The text you see may differ if your system administrator has configured the Group Prompt differently. A drop-down list will also appear with every group you belong to, and you will be able to choose which group to associate with the review using the combo-box.
Once you select a group, the participants list will be updated accordingly to show only those users belonging to the selected group. Changing the group will cause you to lose any unsaved data applied to the review and may invalidate any saved data that is not applicable to the new group.
If you belong to only one group, you will not be given the option of selecting a group; the group will be applied automatically, and the participants list will be narrowed according to the group members.
Template
If you have multiple templates configured under "Review Templates," you will see the Template box (shown at the bottom of the previous screenshot).
If there is only one configured template, you will not be given the option of selecting a template; the single template will be applied automatically. In that case, the first box shown is "Basic Information."
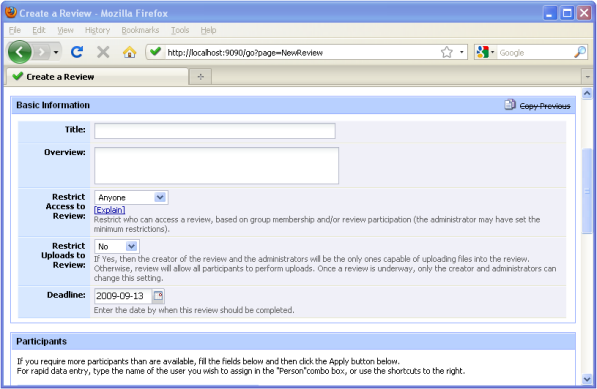
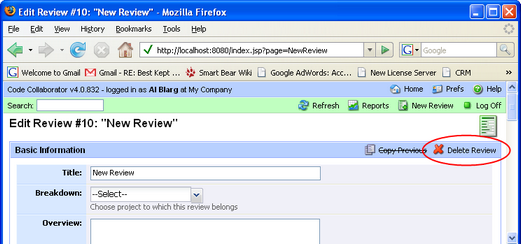
A title must be assigned for the review. The title is used all over the place -- in Action Items, in notification emails, to web page titles, and so forth. Make the title brief but descriptive. Titles do not have to be unique in the system; reviews already have a unique ID that is assigned by the server. (In the example given above, the unique ID is "12" and identified by the red circle)
The next field will be the overview field. Here, you can enter anything to describe the review in more detail. This field is optional and does not have to be filled out if you'd like to leave it empty.
You can also restrict uploads to the review by limiting who can upload files into the review. If this setting is set to "Yes," only the creator and the administrators will be allowed to upload files.
Review Deadline is an option that only appears if a system administrator has set the default review deadline to a value other than 0. In that case, you will see the Deadline option with a default date that is calculated based on the value provided by the administrator. You can set the review deadline to any date that is on or after the current. Once the date has been exceeded, participants will see a note in their action items that that review is overdue, and when the review is viewed, it will be marked as overdue.
If you have previously created reviews, you can also choose the same custom field setting as your previous review by clicking the Copy Previous button next to the Delete Review option.
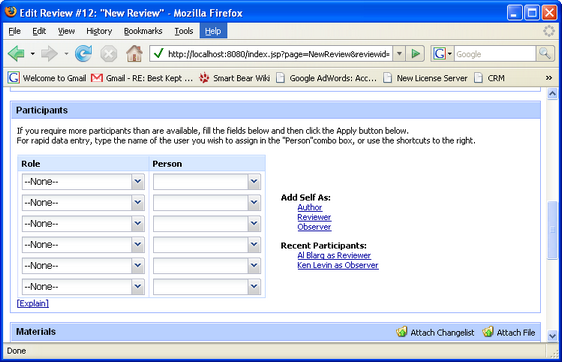
The next step in creating a review is to invite people to the review, and give each of them a role to play.
Since the administrator has complete control over the number of roles and their definitions, it's difficult to give specific information about them.
| • | Author: Responsible for the files under review and probably responsible for fixing any defects that are found. |
| • | Reviewer: Responsible for finding defects; is allowed to mark defects "fixed;" the review isn't finished until all reviewers say it's finished. |
| • | Observer: Invited to the review but if all other participants are finished the review is complete. Useful when this user isn't available just now and you don't want to wait for him to show up. |
| • | Moderator: Controls the pace and flow of the review; coordinates other people and decides when the review changes phases. |
Each invitee can be assigned only one role. However, there is no limit on the number of invites, and, unless the administrator has configured things otherwise, there can be more than one user per role.
You can select each user and role individually through the drop-down menu, or start typing the name of the user in the appropriate field to narrow down the user list. User/role combinations you've used recently will also appear under "Recent Participants." This makes it easy and fast to select common combinations.
Any number and type of file can be uploaded into the review. This includes but is not limited to:
| • | Local file changes not yet checked into version control |
| • | Changes already checked into version control |
| • | Differences between files on your disk |
| • | Files from your local disk |
| • | Review checklists and test scripts |
| • | Requirements and architecture specifications |
| • | URLs |
| • | Images |
| • | PDFs |
In order to attach materials, you must first Apply changes to a review before you attempt to attach your materials.
The most common way to get files attached to a review is to use one of the client components: Command Line Client, GUI Client, Eclipse Plug-in, or Perforce Plug-in. All of these clients can integrate with version control and/or easily upload local files or file-differences to the server.
Local changes from files controlled by Subversion have been uploaded into this review via client.

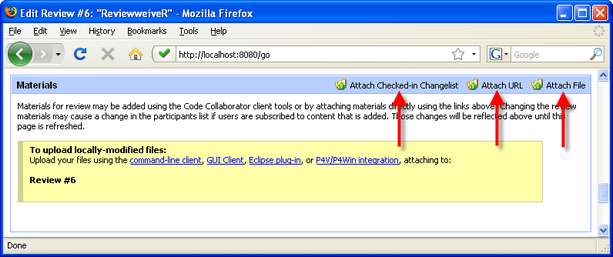
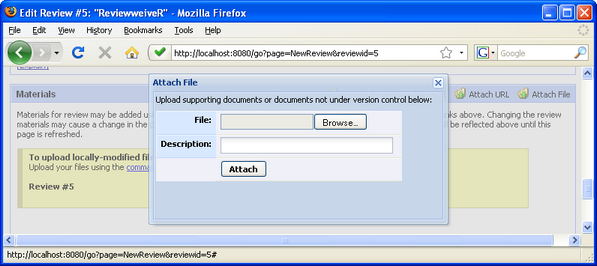
It's also possible to upload content from your web browser. You can attach a changelist (if your Server-side Version Control System has been configured), a URL, or a file. Just click the appropriate button indicated by the red arrows below:
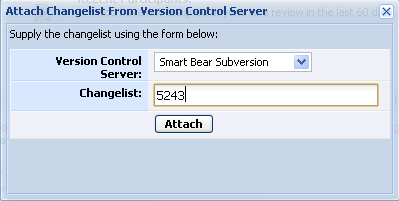
If there's an error retrieving that version or communicating with the server, you'll be presented with an error message. You can attach any number of changelists to a single review, and you can attach changelists from different version control servers to a single review.
The result is exactly the same as if you implemented this operation from a client-side tool, for example using the command-line ccollab addchangelist. The advantage of performing this action from a web browser is that you don't need to install and configure the client.
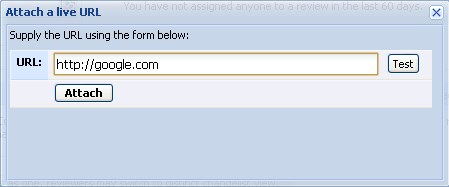
Instead of pulling a copy of the content, attaching a live url will display the live contents of the link during the review. This feature is useful for accessing a document on a Wiki or document management system, particularly if you link to a specific version of that document.
The Attach a live URL dialog does not confirm that the resource named is actually available. In fact, since it's a live link, the contents and availably of the document can change at any time. An error is displayed only if the URL given is malformed.
Once you have attached your document, the attached documents will be listed.
The last step allows you to start the review:
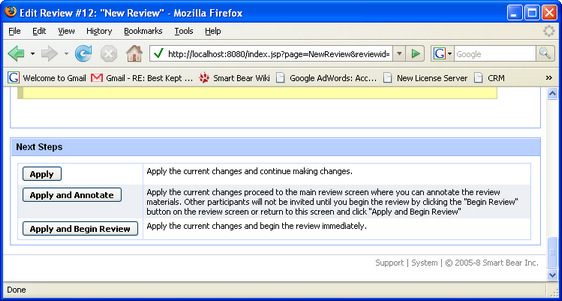
You will have three buttons to click.
By clicking "Apply and Annotate," you will apply the current changes, and the browser will take you to the main review screen so that you may annotate the review materials. However, you will be the only person viewing and editing the review until you click "Begin Review." This means you can go around to each of the files and leave comments for other users to see. This has proven to be an effective way of finding your own defects, thereby making the actual review more efficient for the other participants.
Click "Apply and Begin Review" to begin the review. Until this point, no one else has seen the review in their Action Items, and no notifications have been sent out. As soon as you click the button, the review will start.
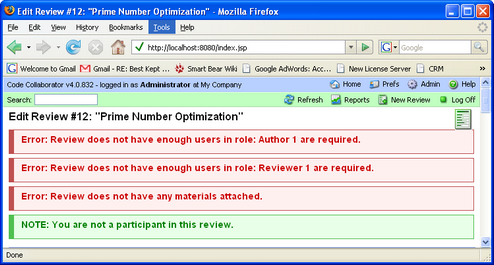
If you go to this step without having properly completed the steps before, you will see explanatory error messages in red:
To cancel a review before it begins, use the Delete Review button on the top right of the "Basic Information" box: