A few controls at the top of the chat session in the diff viewer allows you to do a few special chat-related things:
![]()
When other users chat, their messages appear immediately and automatically in your chat view -- even without having to refresh the screen. You can Pause and Resume this auto-refresh mode using the toolbar button as shown above.
Usually, you have to manually mark each chat "read" or else respond to the chat to clear the "unread chat" flag. Alternatively, you can Mark All Read using the toolbar button as shown above. Your system administrator is able to disable this feature, so you might not actually see this on your diff viewer.
You can also hide the chat session if you do not wish to view the chat windows in the diff viewer by clicking the double arrows.
Viewing differences is just the start -- you need to be able to chat about specific lines of code.
To start a new chat session, just click on a line of code and start typing. The interface will open up automatically and accept your chat message:
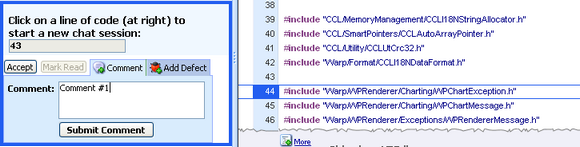
When you hit Submit Comment, your message is transmitted to all other users and you've started a threaded conversation for that particular line of code. In this case, it would look something like this:
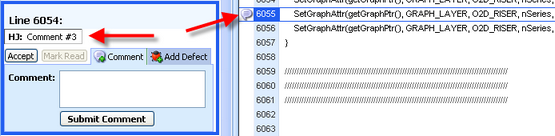
Notice how the conversation is now threaded by line (6054) and how a little icon appears next to the source code where the conversation was made.
When you type the name of a file in the same review, it will turn into a link to that opens that file. You can also link to a different line number in the current file by typing "line 123".
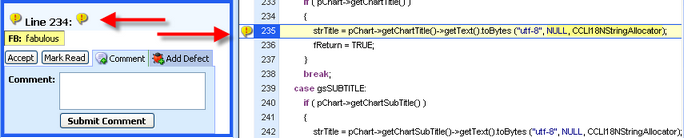
To clear this "unread chat" state, send a chat message back to the other user. You can also click the Accept button.
Many people use "Accept" as sort of a bookmark within the review to keep track of what files they've already looked at. Some people use it to mean explicit agreement with the conversation (as opposed to simply not replying, which is implicit agreement).
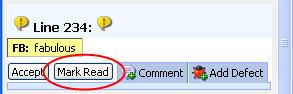
If you want to clear the "unread chat" state without saying something, click the Mark Read button:
When you want to indicate that there's a problem that needs to be fixed -- not just more chat -- you open a defect. Do this using the Add Defect tab instead of the Comment tab:
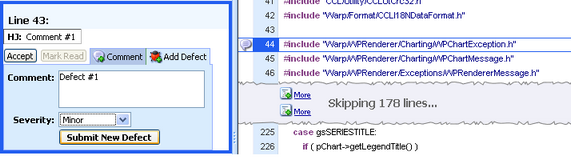
Besides the comment text, defects can have any number of additional fields. These are all completely configurable by the system administrator and can also vary depending on the review workflow that was originally selected for the review. Because this is completely configurable, this manual cannot say exactly what the fields will be or what they mean; ask your administrator for details. It is common to see fields like severity, type, checklist item, and phase-injected.
Once the defect is created, it is added to the chat area and a defect log is started on that line of code:

Every defect is given a unique number; in the example above the number is 1. This number can be used when referencing the defect elsewhere.
You can have any number of defects on a single line; all will be logged into the list beneath the chat area.
You can Edit a defect by clicking [Edit] in the defect log. Or Delete a defect by clicking [Delete]. All of these activities will be logged into the chat conversation area as an audit trail of what happened.
Warning: It's tempting to delete a defect once the author has corrected the problem, but this is the wrong thing to do. You want to keep the defect record around, just mark it "fixed." This process is described next.
Delete a defect only if it turns out that it really wasn't a defect at all.
Warning: The word "defect" has many connotations that are inappropriate for code review. This doesn't mean the problem will be mirrored in an external issue-tracking system, and it doesn't necessarily mean it was a bug! Even "bad documentation" can be a defect.
A "defect" is just a way of identifying something that needs to be fixed.
Later, after the author has attempted to fix the defects and has uploaded the new files to the review, the reviewers will verify that the fixes do fix the defect and don't open more defects in the process.
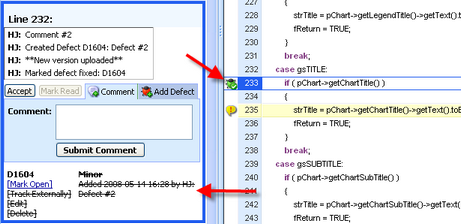
When the fix is verified, click [Mark Fixed] to indicate this fact. The conversation area and defect log will be updated to reflect this new state:
Sometimes you decide that a defect should be fixed at a later date. You don't want to mark it fixed because it isn't fixed yet. But you don't want to delete it either because it's still a defect.
The answer is to use the [Track Externally] link as shown below:
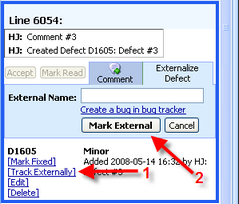
This does two things. First it prompts you to create a new defect in your external issue tracker, then allows you to type in the associated issue ID in a field. Second, it changes the state of the defect from "Open" to "Tracked Externally."
This special state tells everyone else that (a) the review can complete but (b) the problem wasn't fixed during the review and (c) how to find the external issue for further auditing. The state appears on the Review Overview screen with a special icon:

You can always undo the "Tracked Externally" state by clicking on the associated link [Not External]. This link will be in the place where [Track Externally] was. This will re-open the defect, restoring it to the state it had before the externalization.