Code Collaborator can be backed up while it is running. Also, there is a system for migrating data from one database to another.
Code Collaborator stores almost all data in the database initially set up for it. It also uses a local directory to store copies of uploaded files. These are the two systems that need to participate in the backup/restore process.
Backing up the Database
The mechanism for backing up the database depends on the database. All supported databases have some mechanism for live backup. See the documentation for your database for details.
Backing up the File Cache
The local directory you need to back up is located here (by default -- it can be changed by the system administrator):
installation-directory/tomcat/collaborator-content-cache
Typically, a backup mechanism will either copy this directory elsewhere or will keep a zip or other compressed archive file updated with the contents. You can do this while Code Collaborator is running, although most backup mechanisms will run at off-peak hours.
Files in this cache are stored in such a way that a file is written only once and thereafter is never changed. This means incremental backups of the directory are particularly easy -- only new files must be copied. Most file-copy utilities have a mode that means "only copy new files."
Restoring a Code Collaborator Backup
To restore a Code Collaborator installation, first restore the database as directed in your database documentation. Then, install the Code Collaborator server software. Finally, restore the contents of the collaborator-content-cache directory in the new installation directory. You can do this last step while Code Collaborator is running.
If you've used the database migration technique to back up the database, refer to that section for instructions on restoring the database data.
Code Collaborator has a generic mechanism for migrating data between databases -- even if the databases are completely different types.
Applications of this migration technique include:
| • | migrating between the embedded database and one of the other databases when a trial moves to a production environment |
| • | backing up a database in a database-independent and easily-inspected manner |
| • | when we add support for a new database and you want to switch over to it |
| • | we need to debug your database and you need to send a "dump" of your data to Smart Bear Technical Support |
There are two halves to the migration process: Creating the migration data dump file, and "restoring" a data dump file into a Code Collaborator installation.
To create the migration data dump file, log into the Code Collaborator web server and click the System link at the bottom of the screen:
Near the top of the screen is a form and a button, which will allow you to download a "Whole System Dump:"
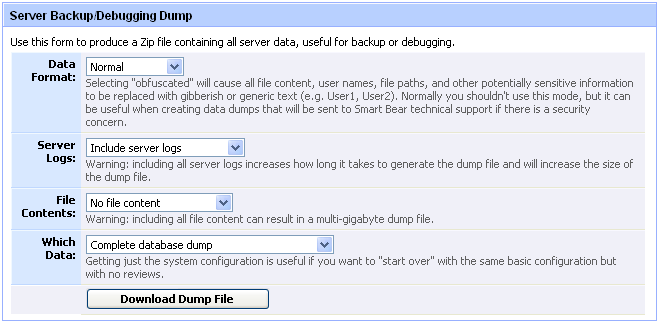
Fill out the fields to your preference:
1. Data Format: Normal - Selecting "Normal" will leave the data as is.
Obfuscated - Selecting "Obfuscated" will change the data to conceal sensitive information.
2. Server Logs: Include server logs - Selecting this will include server logs in dump, but will also cause the download to take longer.
Don't include server logs - Selecting this will not include server logs in the dump file.
3. File Contents: No file content - Selecting "No file content" will not include file content.
Include all file content - Selecting this will include all file content, but this will also cause a longer download.
4. Which Data: Complete database dump - This must be selected for whole system dump.
System configuration only - no review data - Selecting this will only save the system settings.
Once you've filled out the form, click the "Download Dump File" button to download the database dump file. This is a ZIP file containing all your database data in a platform- and database-independent XML format, plus additional files that describes your server environment.
Loading this data into another Code Collaborator installation requires some effort. This process is intentionally complex to prevent accidental destruction of real data.
Here are the steps to restoring a database migration data dump file:
| 1. | Make sure the Code Collaborator server version and build number is identical between the server that created the dump and the server that is loading the dump. If the versions don't match exactly, the dump might not succeed. Smart Bear maintains installers for previous versions of the server if you need one. You can always upgrade to another version after the migration. |
| 2. | Move the dump file into a known location. In this example we'll assume the location is: c:\tem\ccollab-dump.zip. |
| 3. | Make sure the Code Collaborator server is not running. This will not work on a running server. |
| 4. | Open the Tomcat session configuration file located here: installation-directory/tomcat/conf/Catalina/localhost/ROOT.xml |
| 5. | Find the parameter called database-migration-data-path, or create one if it doesn't already exist. It should look something like this: <Parameter name="database-migration-data-path" value="c:\tem\ccollab-dump.zip" override="false" /> |
| 6. | Make sure the value string matches the location of the dump file, as in the example above. Use an absolute file path. |
| 7. | Save the configuration file. |
| 8. | Use a database administration tool to make sure the database configured for use with Code Collaborator has no tables in it. If there are any tables in the database the restore will not work. This prevents accidental restoring over an existing database. |
| 9. | Start the Code Collaborator server. |
| 10. | The server will automatically load the data from the database migration data dump file. If there were any problems with migration, you will see a helpful error message in the server log. The server will also log progress reports as data is loaded up, so if you have a large database and you wish to monitor migration progress you can "tail" the log file to see what's happening. Loading migration data can take a long time, so be patient! |
| 11. | Upon starting after restoring a migrated database, email notifications will be disabled. This is to prevent users from receiving spurious duplicate email notifications when administrators restore into test configurations. You may re-enable email notifications from the email administration page. |